Lighting in kittys rooms.

Published by Spider-Doo under on 12:35
I started setting up of the lighting in this room, but I didn't want the clouds casting shadows on the rest of the environment. So I selected the objects that I didn't want the shadows to be cast and turned this option off in the render stats.

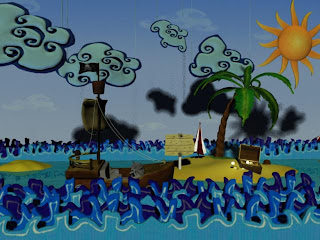
An occlusion pass of her room.
Here's what it looks like after the shadows have been turned off.
I also wanted to give the sun a glow as if it has a light inside.
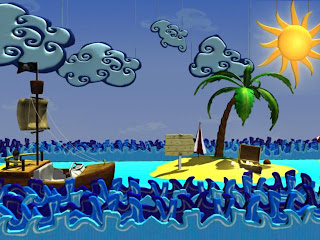
This is the rainbow road room.

Animation in the rainbow road room

Published by Spider-Doo under on 06:53

Here ive done differernt animation test for the rainbowroad room.


Rainbow Animation from Jake Childs on Vimeo.


Rainbow Animation 2 from Jake Childs on Vimeo.


Rainbow Animation 3 from Jake Childs on Vimeo.

The Graveyard Grass done

Published by Spider-Doo under on 10:20
This is basically how the graveyard grass is going too look. The ground still needs to be textured to cover up part of the grass and where the track lies.But here's some pictures of what ive done.

Test shots for kittys room

Published by Spider-Doo under , on 13:19
Now that I have everything in both of kittys scenes and pretty much in place, its just a matter of tweaking a few things too look the best it can be!

This is island scene.

This is more cardboardy textured cloud's and waves.


This is the rainbow scene.

The graveyard grass

Published by Spider-Doo under on 13:03
I have now taken on the grass in the graveyard, same sort of process as the exterior
environment but without the flowers just plain grass. Some parts are looking more green that others but this is still in the early stages.

Heres some screens shots.

This weeks to do list !! 25th of May

Published by Spider-Doo under on 12:45
From last weeks list of to do, Ive done kittys hair again, Ive been texture lots of kittys environmental objects, finished off modelling and texture kittys boat, Ive done some cart smashing animation and rainbow animation.

This weeks tasks.
  • Compose kittys environments
  • Finalise a few things.
  • Possible start rendering the caves scenes.

New path textures up date

Published by Spider-Doo under on 10:57
I have came back to looking at the path trying to make less blurry. The best way I thought was to only texture right in front of the selected camera view and nothing else. This is because there would be more detail in this one section then the entire scene. Also I used a 2048x2048 texture.


This is one of the texture that i made.

Rainbow Animation

Published by Spider-Doo under , , on 15:32

Above is the textures I used to for the rainbow animation, which was done by animating along a curve. Its was done with surfaces then converted to a poly as you cant use the extrude under the polygon tabs. The hardest part was getting the spacing in the aches correct so its doesn't look odd.

This was the tutorial that I looked at to achieve the rainbow.

http://www.wonderhowto.com/how-to/video/how-to-extrude-a-surface-along-an-animated-curve-in-maya-248996/


kittys Boat cart

Published by Spider-Doo under , on 13:51
Here's is kitty's cartoon like boat that fits around her cart. The original concept was to have the boat fold out as she enters the room, but because of the time constraint on here scene this would have worked out.

These are some early shots of the boat in wire frame mode getting the concept and style of the boat right.


This is basically the boat finished with out any texture yet. I really like the style of her scenes in contrast to the rest of the animation.

Here's the texture maps for the boat.

Cart Smashing into the jury room.

Published by Spider-Doo under , , on 13:28
I started looking into the cart smashing through into the jury room from the tests that I done at the start of the year. I quickly picked up from where I left off. I had to make a special map for each plank so that when the cart hits, they break up like wood smashing apart. There are a few tweaks that Ive still got to do, but this wont take too long. The debris and chunks of wood will be composited in at the end.

This is the fracture map that determines how the pieces brake up, but this was the wrong size and all the parts didn't break up like in the image.

I re sized it to 60 pixels by 60pixels like in a tutorial and even though it looked OK in the screen it still didn't break up properly.I decided to do each plank with this fracture map below and its works a treat :D


Here's a few screen shots attempts that Ive tried.
If there is time I will use this same plug in (blast code) for the zombie hand smashing through the mausoleum.


Here's a few different video clips of my attempts at getting it right.


basic dolphin rig

Published by Spider-Doo under on 11:23
Here I rigged a dolphin to swim around it kittys scene, it was only simple but here's what i did. This scene might be too short to even see the animation of the dolphin, but we will see.

I used programme called camtasia studios to screen record what I have done so you can see the movement of the rigged dolphin. Its a very nice programme though I didn't realise it picked up my music in the background haha.

flag animation test on the castle for kittys room

Published by Spider-Doo under , on 15:55

Here I wanted to add some animation to the flags on top of the castle as flags would naturally be moving in the wind. This scene is going to be very short so you wouldn't necessarily see this this but it will be better then solid flags not moving and it will add the the rest of the scene making it move believable.

Kittys hair

Published by Spider-Doo under , , on 08:41
This is the new and improved hair style after a few tweaks and decision from Anna this is what I have done. It looks alot better than the other style.
Glad thats done :P

The grass looking like grass :D

Published by Spider-Doo under , on 02:25
Here is a compilation of different shots at different stages when I was making the grass.
This is a simple texture that I made quick in photshop to define a path and where the grass should be.
This was a picture that I found on 3D total which I really liked which was created in maya. I used parts of this for reference.

Kittys hair attempt

Published by Spider-Doo under , , , on 02:01
Over the weekend I have had a go at creating hair for kitty. This was a process of taking a low ploy version from maya into Z brush to start sculpting and adding extra detail. Then from here take that mesh back into maya to extract only the hair and take that hair mesh into mudbox to paint. then back to maya finally.

These were previous attempts at creating hair few weeks ago.

For the low ploy mesh which I took into Z bursh I used the top version of kitty as it looked like original designs .In Z brush I was using different tools to volumise the hair and add more detail.

Thess two pictures below were the first attempts at creating the hair for kittys. This was very hard to get the hair looking right. Some parts just look odd.
This is the second attempt, which I began to make the fringe longer and defined andmore detail.
Once I was quite happy with what I had done I started to texture this in mudbox adding a highlights and a bump map.
Hair colour map.
Hair bump map.