The end of the line.
Published by Spider-Doo under on 06:01
Now that we have come to the end of the year where we handed in our film in Friday just gone, Ive take some time to reflect on the overall project.
I was very please to be working on Anna’s film with Dan Cripps and Dan Ryan as we all get on very well with each other and know that we can rely and trust one another.
From the very beginning we all new our roles in the film. Me, Anna and Dan Ryan will be doing modelling, texturing, concept art, while Dan Cripps will be animating and rendering. We all decided the camera shot from for the storyboards to the block out as we could all discuss and talk about each scene.
The film as a whole has been very enjoyable to work on learning many new things like texturing in Mudbox, using render layers, using the render farm and many other bits. Am very please with the out come of our final film, as it shows off all our skills that we put into the film. Although we still have had our fair share of problems along the way with many things like the rendering farm being stupid, rigging problems and other technical stuff. What it all comes down to is the final animation film at the end and I think this is a good reflection of our 3years at Ravensbourne. There are still a few things that we need to tweak on the film for the RSA degree show as other factors out of our control have stopped us working on parts, but these wont be major changes so it won’t take too long.
Am glad that we have finished our film now and that all the hard work has paid off to produce what we have, but on the other hand a little sad that we wont be working together anymore on a project and seeing other people as much from our class.
Our only other thing to consider is entering our film into different animation festivals and to win as many as possible. :D
Time plan
Published by Spider-Doo under on 03:53
Heres a time plan for Easter and the third term.


The other terms time plans can be found on Annas blog page here:
http://therideproject.blogspot.com/2009/06/aims-for-last-two-weeks.html
More compositing
Published by Spider-Doo under on 16:14
This is scene one shot seven that I have compositied together and graded to show the different layer involved in making up this scene.
In the image there is a character layer, an enivronement layer, a sky layer, paint effects layer and a shadow layer.
I thought this would be a good way of showing people the different layers in this video below.
In the image there is a character layer, an enivronement layer, a sky layer, paint effects layer and a shadow layer.
I thought this would be a good way of showing people the different layers in this video below.
The ride scene 1 shot 7 from Jake Childs on Vimeo.
Render Farm issues!
Published by Spider-Doo under on 15:29
Now we have a render farm one may think that everything would go so smoothly with rendering and things would be rendered a lot quicker then rendering from one pc machine. This is the common thought most people had in our class. Over the last couple of weeks we have had many issues with the farm like;
If there's lots of different jobs going at once and more pending then it WILL be quicker to render on a local machine then sending it to the render farm. The old way seems to be more reliable and less hassle providing that we have computers to work on..
This term is probably the most intensive use that the render farm has been put under. There was always going to be some problems as being one of the first to use this. But hopefully issues can be resolved for the next time.

- Only using one CPU out of 128 which makes it useless. (This was resolved)
- Maya jobs keep failing.
- Simple renders taking ages to render out.
- Getting stuck on one frame making the whole job fail.
- Rendering the frames out saying that its done but only to find the images are blank.
- Finding missing frames when its says its complete.
If there's lots of different jobs going at once and more pending then it WILL be quicker to render on a local machine then sending it to the render farm. The old way seems to be more reliable and less hassle providing that we have computers to work on..
This term is probably the most intensive use that the render farm has been put under. There was always going to be some problems as being one of the first to use this. But hopefully issues can be resolved for the next time.

Cave screenshots
Published by Spider-Doo under Modelling on 12:03
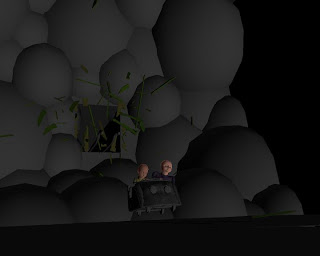
Here are some screen shots of the cave where you can see inside from the out side.
Forth cave
Third cave Second cave
 First cave

Some more screen shots of the cave in wireframe mode.


Forth cave

Third cave
 Second cave
 First cave
Some more screen shots of the cave in wireframe mode.


This week
Published by Spider-Doo under on 11:51
Most of this week we all have been compositing together the images that have been rendered out. There has been a few problems with some of the layers where some things in the scene have been left out which means they have to be rendered out again, wasting more time.
But now we have got most of the scene all rendered out and composited, its just a few little things to clean up here and there, so I think its going ok.
But now we have got most of the scene all rendered out and composited, its just a few little things to clean up here and there, so I think its going ok.
Cave image composite
Published by Spider-Doo under on 04:11
For the pictures used for D&AD and the RSA catalogue I wanted a picture of the caves to submit. For this Ive used many layers to get to the final images. This will be the same sort of process used when compositing the cave animation.
In the video below you can see the final image, the layer break down of the picture and then the final images again.
In the video below you can see the final image, the layer break down of the picture and then the final images again.
Compositing today
Published by Spider-Doo under on 13:06
Today I started on some of the exterior shots that needed compositing. This was a process of getting the render layers from the render farm and organising this in After Effects so everything is in the right order. You have to make sure that the frames you are importing are at 25 FPS and not the default of 30FPS, this also has to be changed in the overall composition. Other wise the animation time will be off.
The main effects that Ive added were;


Once this is done then the fun starts. I stared adding different effects to the layers and on an Adjustment layer which effects all layers beneath it.
- Brightness & contrast
- Curves
- Exposure
- Hue & Saturation
- Tint
- Glow
Here are some images that Ive done today.


Kittys Balloon
Published by Spider-Doo under animation on 11:40
kittys was meant to holding a balloon in the island room, but had to be cut out. So here she is holding a balloon.
Kittys ride
Published by Spider-Doo under animation on 11:25Here I was doing more animation of kitty in her cart. I wanted to animate the cart, trying to get the weight right and also have the animation of kitty inside.
Am please with the videos above with the time that I have with this animation. Theres room for improvement but time is of the essences.
kitty island
Published by Spider-Doo under on 14:14
kittys room composited togther. The website on the left hand side www.videocopilot.net
is a really really good website for compositing footage and lots of effects. Anyway back to the DOF, in After Efects i set up a simple ramp as you can see. The black part of the ramp make things go out of focus and hte White part is in focus.
 This is a proper DOF map, rendered out in maya that is used in our cave sequence. As you can see like the ramp the further away from the camera is darker which is out of focus and the nearer the camera which is lighter is in focus
Animation in kittys room
Published by Spider-Doo under animation on 13:34
Ive started doing little animating test in Kitty's cart and her inside the cart.this was quite a challenge as I haven't really done much this this before. I started off just animating the cart getting the speed and the weight right then I added kitty.
Today looooong task
Published by Spider-Doo under on 13:23
Today Ive been finalising my pictures for the catalogue and D&AD. This has been quite a long process, as I wasn't to sure which one to use, but now Ive picked the ones I like and Ive been composting the layers together.
This what Ive done.


I had slight problems with the depth map as I didn't know how this essentially effects the other layers in After Effects, but in the end I got it to work.


p.s hundredth post ! :D
Character animation
Published by Spider-Doo under animation on 16:17
For the animation folder I stared to do some walk and run cycles of my character kitty. Here's whats Ive got ! :D
walk cycle
walk cycle
Slow walk cycle
Run cycle
This weeks to do list !! 1st of June
Published by Spider-Doo under on 16:15
This weeks tasks are:
- Do some character animation.
- Knock up some renders for the catalogue and D&AD
- Some composite test renders.
Lighting in kittys rooms.
Published by Spider-Doo under on 12:35
I started setting up of the lighting in this room, but I didn't want the clouds casting shadows on the rest of the environment. So I selected the objects that I didn't want the shadows to be cast and turned this option off in the render stats.
An occlusion pass of her room.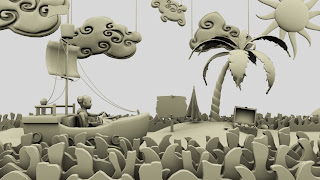
Here's what it looks like after the shadows have been turned off.
I also wanted to give the sun a glow as if it has a light inside.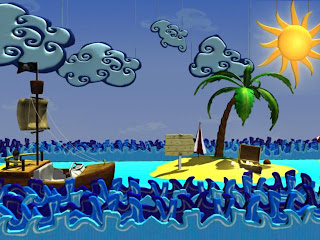
This is the rainbow road room.

An occlusion pass of her room.

Here's what it looks like after the shadows have been turned off.

I also wanted to give the sun a glow as if it has a light inside.

This is the rainbow road room.

Animation in the rainbow road room
Published by Spider-Doo under animation on 06:53Here ive done differernt animation test for the rainbowroad room.
Rainbow Animation from Jake Childs on Vimeo.
Rainbow Animation 2 from Jake Childs on Vimeo.
Rainbow Animation 3 from Jake Childs on Vimeo.
The Graveyard Grass done
Published by Spider-Doo under on 10:20
This is basically how the graveyard grass is going too look. The ground still needs to be textured to cover up part of the grass and where the track lies.But here's some pictures of what ive done.


Test shots for kittys room
Published by Spider-Doo under Modelling, Textures on 13:19
Now that I have everything in both of kittys scenes and pretty much in place, its just a matter of tweaking a few things too look the best it can be!
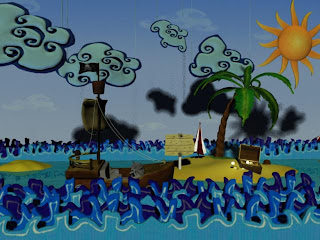
This is island scene.


This is more cardboardy textured cloud's and waves.


This is the rainbow scene.


This is island scene.


This is more cardboardy textured cloud's and waves.


This is the rainbow scene.


The graveyard grass
Published by Spider-Doo under on 13:03
I have now taken on the grass in the graveyard, same sort of process as the exterior
environment but without the flowers just plain grass. Some parts are looking more green that others but this is still in the early stages.
Heres some screens shots. 

This weeks to do list !! 25th of May
Published by Spider-Doo under on 12:45
From last weeks list of to do, Ive done kittys hair again, Ive been texture lots of kittys environmental objects, finished off modelling and texture kittys boat, Ive done some cart smashing animation and rainbow animation.
This weeks tasks.
This weeks tasks.
- Compose kittys environments
- Finalise a few things.
- Possible start rendering the caves scenes.
New path textures up date
Published by Spider-Doo under Textures on 10:57
I have came back to looking at the path trying to make less blurry. The best way I thought was to only texture right in front of the selected camera view and nothing else. This is because there would be more detail in this one section then the entire scene. Also I used a 2048x2048 texture.

This is one of the texture that i made.


This is one of the texture that i made.

Rainbow Animation
Published by Spider-Doo under animation, Test, Textures on 15:32
Above is the textures I used to for the rainbow animation, which was done by animating along a curve. Its was done with surfaces then converted to a poly as you cant use the extrude under the polygon tabs. The hardest part was getting the spacing in the aches correct so its doesn't look odd.
This was the tutorial that I looked at to achieve the rainbow.
http://www.wonderhowto.com/how-to/video/how-to-extrude-a-surface-along-an-animated-curve-in-maya-248996/
kittys Boat cart
Published by Spider-Doo under Modelling, Textures on 13:51
Here's is kitty's cartoon like boat that fits around her cart. The original concept was to have the boat fold out as she enters the room, but because of the time constraint on here scene this would have worked out.
These are some early shots of the boat in wire frame mode getting the concept and style of the boat right.


This is basically the boat finished with out any texture yet. I really like the style of her scenes in contrast to the rest of the animation.

Here's the texture maps for the boat.

These are some early shots of the boat in wire frame mode getting the concept and style of the boat right.


This is basically the boat finished with out any texture yet. I really like the style of her scenes in contrast to the rest of the animation.


Here's the texture maps for the boat.


Cart Smashing into the jury room.
Published by Spider-Doo under animation, Dynamics, Test on 13:28
I started looking into the cart smashing through into the jury room from the tests that I done at the start of the year. I quickly picked up from where I left off. I had to make a special map for each plank so that when the cart hits, they break up like wood smashing apart. There are a few tweaks that Ive still got to do, but this wont take too long. The debris and chunks of wood will be composited in at the end.
This is the fracture map that determines how the pieces brake up, but this was the wrong size and all the parts didn't break up like in the image.

I re sized it to 60 pixels by 60pixels like in a tutorial and even though it looked OK in the screen it still didn't break up properly. I decided to do each plank with this fracture map below and its works a treat :D

Here's a few different video clips of my attempts at getting it right.

I re sized it to 60 pixels by 60pixels like in a tutorial and even though it looked OK in the screen it still didn't break up properly.
 I decided to do each plank with this fracture map below and its works a treat :D
Here's a few screen shots attempts that Ive tried.


If there is time I will use this same plug in (blast code) for the zombie hand smashing through the mausoleum.


Here's a few different video clips of my attempts at getting it right.