Painting Objects

Published by Spider-Doo under on 06:06
For creating an exterior environment things have to look organic and not look like they have been place there by some one. I was looking at different tutorials on different websites and there was one that I kept seeing and didn't know what it was trying to do. I found out that it was for using the paint tool for geometry that you have made so you can paint this onto a surface.

This is the tutorial that I looked at.

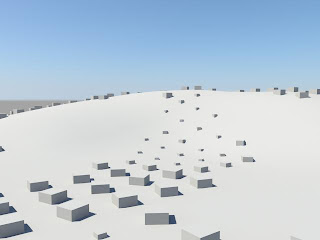
I thought I could use this as a way of making rocks or other objects that can be put into the environment more randomly taking little time as possible.

I got to the end of the tutorial and it still didn't work. It just wouldn't paint my objects that I made. I went looking for similar tutorials on this and there were no others. After 30mins of messing about trying different buttons etc I looked in the Maya help files. Normally there not much help but this time it was. In the tutorial they miss out one of the important part to make it work. I had made the object away from the center grid which is needed in order for it to work. So I redone the tutorial with the object in the center of the grid and it worked ! YAY ! hehe

Here's what I messed about with that only took like 1min to do.


To model so far

Published by Spider-Doo under on 02:59
The things that I am going to model so far are : The character Kitty, the mine cart scene and am doing some of the exterior props. Obviously there is going to be a lot more but this is what we have decided so far.

Mine cart: This will in clued the cave/tunnel, lava, rocks lanterns, the track, wooden crates, stalagmites/stalactites.

Exterior props: The fence, chain and padlock, grass, rocks, path, possible trees, and what ever will come up outside.

Once I have done these models they will be on the blog to show you all how wonderful they are !

Second week back

Published by Spider-Doo under on 02:42
Well its the end of the second week back into the the term and things are in full swing again. As a group we sat down and planed out what me, Anna and Dan R had to model in accordance of importance. Then later on we split some of these up to what we had to individually model. The main priority was to have the main characters model first as they are the most important.
I had started modelling Kitty over Christmas just starting to get things rolling slowly. I would say that am about 50% of the way there so far, but still a lot to carry on with.

Since I made a sculpture of Kitty over Christmas, this has really helped me look at her in a 360 degree view rather than a 2D image. So I will be using my sculpture as a very good reference.

Smash !

Published by Spider-Doo under , on 05:31
I have now worked out a very nice way of having the mine cart crash though the wood going into the next room. It took a while looking back at the previous test Ive have done with the Blast code plug-in. The main problem I was having was adding gravity and making the particles collide with a floor so they don't go through. The other thing I needed to achieve was making it brake apart more like wood then bricks.
This is the fracture map that I made in Photoshop, so when the impact of the cart hits the wood, it will break up upon where the white lines are. This way I can produce how the wood will break up.
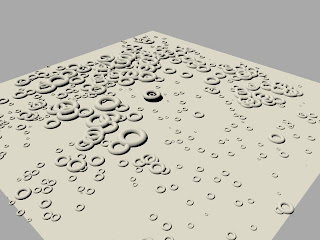
Once I had this fracture map it was easy to Uv map the texturte on the surface.


In these videos below this is what I have got so far. There looking a lot better then the first ones.


SuperSculpey Kitty

Published by Spider-Doo under on 12:31
After seeing the models that other people had done in the class, I wanted to do my own model of a character from our film over Christmas. Since I was going to model Kitty in Maya I thought I might as well model her so I can get a better idea of what she going to look like.
I drew some scaled pictures of Kitty from the front and side and set about making the armature. I was using some steel wire to make the bulk of the armature and some thinner copper wire for the arms and fingers.

To make the armature I was using John Brown work as reference to get an idea on which way would be the best.
John Brown website
I was using some of the techniques that he explains on the training DVD about sculpturing which was very helpful.
I really enjoyed doing the sculpture and I thinking of doing another one : )
Here are some picture of the sculpture.